Full-stack Advanced [OGI06j]
08. Auth
Authentication
verifying who a user is
&
Authorization
verifying what a user has access to
08.1
Authentication
= verifying who a user is
Authentication
-
Laravel's Authentication
-
API containing basic authentication methods such as
Auth::login() -
To be configured in
config/auth.php- Guards: how are users authenticated technically? e.g. session
- Providers: where is the user information stored and how can it be retrieved? e.g. in the
userstable with Eloquent - Resetting passwords: reset token table, timeouts, …
-
Default (and only) config: session
⟶ stateful
⟶ intended forroutes/web.phproutes, not forroutes/api.phproutes
-
API containing basic authentication methods such as
-
Authentication logic = controllers, views, routes for
- logging in/out
- registration
- password reset scenarios
- email verification
- You could write your own authentication logic (controllers, views, routes)
Pre-built authentication logic
-
⚠️ Discontinued ⚠️
Dev packages scaffolding(1) the entire authentication logic (controllers, views, routes)- Laravel UI 4.x (Bootstrap, Vue or React; deprecated from Laravel core)
- Laravel Breeze (React+Inertia, Vue+Inertia or Livewire; discontinued)
-
✅ Laravel Fortify
-
A (front-end agnostic) package/library containing the controllers & routes of the authentication logic
⟶ controllers and routes are inside the library
⟶ black-box-like customization throughFortifyServiceProvider
-
A (front-end agnostic) package/library containing the controllers & routes of the authentication logic
-
✅ Laravel's Starter Kits
-
only installed through the Laravel Installer(2) by
laravel new name-of-my-app - contain a preconfigured authentication logic (views), built on top of Fortify (controllers & routes)
- only for new projects
- front-end presets: React+Inertia, Vue+Inertia or Livewire
-
only installed through the Laravel Installer(2) by
The Next Steps …
… explain Laravel's authentication without pre-built authentication logic
… for a web application
Step 1: Migrations
-
Step 1: make sure you have the
usersandpassword_resetstable in your database -
Use the preconfigured migrations (or copy and extend them)
Schema::create('users', function (Blueprint $table) { $table->id(); $table->string('name'); $table->string('email')->unique(); $table->timestamp('email_verified_at')->nullable(); $table->string('password'); $table->rememberToken(); // can store the hash of a login cookie $table->timestamps(); }); - Integrate this table in your DB design (add columns, FKs, …)
Step 1B: Seeding
-
Optional: if you want to seed your database with 1 or more test users, tailor a
UserSeederto the users table's modelclass UserSeeder extends Seeder { public function run(): void { DB::table('users')->insert([ 'name' => Str::random(10), 'email' => 'theboss@gmail.com', 'password' => Hash::make('Azerty123'), // add more column values here e.g. a role, a company_id, ... ]); } }
Step 2: Eloquent
-
Step 2: you will use Eloquent's preconfigured
Usermodel (app/Models/User.php)class User extends Authenticatable { // The attributes that are mass assignable. protected $fillable = ['name', 'email', 'password', ]; // The attributes that should be hidden for serialization protected $hidden = ['password', 'remember_token', ]; // Get the attributes that should be cast. protected function casts(): array { return [ 'email_verified_at' => 'datetime', 'password' => 'hashed', ]; } } - Add your own attributes, Eloquent relationships, … to this class
Step 3: Deploy the Authentication Logic
-
Manual example logging in/out
-
routes
Route::get('/login', [AuthController::class, 'showLogin'])->middleware('guest')->name('login'); Route::post('/login', [AuthController::class, 'login'])->middleware('guest'); Route::post('/logout', [AuthController::class, 'logout'])->middleware('auth')->name('logout'); - AuthController
public function showLogin(): View { return view('login'); } public function login(Request $request): RedirectResponse { $credentials = $request->validate([ 'email' => 'required|email', 'password' => 'required', ]); if (Auth::attempt($credentials, $request->filled('remember'))) { // attempt = Auth::hasValidCredentials + Auth::login $request->session()->regenerate(); // regenerate session id; prevents a session fixation attack return redirect()->intended('dashboard'); // intended = attempted URL before auth interception } return back()->withErrors(['email' => 'The provided credentials do not match our records.'])->onlyInput('email'); } public function logout(Request $request): RedirectResponse { Auth::logout(); $request->session()->invalidate(); // remove session data and regenerate session id $request->session()->regenerateToken(); // regenerate CSRF token return redirect('/'); } -
routes
Step 3 continued
-
Manual example logging in/out
- login.blade.php (simplified)
<x-layout>
    <x-errors/>

    <form action="{{ route('login') }}" method="post">
        @csrf

        <label for="email">Email</label>
        <input type="email" name="email" id="email" value="{{ old('email') }}" required="required">

        <label for="password">Password</label>
        <input type="password" name="password" id="password" value="">

        <label for="remember_me">Remember me</label>
        <input type="checkbox" name="remember" id="remember_me">

        <button type="submit">Log in</button>

    </form>
 </x-layout>
Step 4: Redirect Paths
-
Step 4: set your redirect path for unauthenticated users
-
set your redirect path if unauthenticated in
bootstrap/app.php// by default it redirects the unauth. user to the route *named* login ->withMiddleware(function (Middleware $middleware) { $middleware->redirectGuestsTo('/login'); // Or, using a closure... $middleware->redirectGuestsTo(fn (Request $request) => route('login')); })
-
set your redirect path if unauthenticated in
Step 5: Protecting Routes
-
Step 5A: plug the
authmiddleware to each action requiring authentication- How? See the slides about middleware
-
Step 5B: plug the
guestmiddleware to each action requiring not being authenticated
Coding with auth
-
Use the
Authfacade in your code
use Illuminate\Support\Facades\Auth;

$user = Auth::user(); // retrieves the authenticated user; same as $user = $request->user();
$tasks = Auth::user()->tasks; // oh yes! it's an Eloquent object!
$id = Auth::id(); // retrieves the currently authenticated user's ID

if (Auth::check()) {
    // the user is logged in...
    // you don't need to check this when the route is behind the auth middleware
}

Auth::logout();- Blade's auth directives
@auth
    // The user is authenticated...
@endauth

@guest
    // The user is not authenticated...
@endguest
Further reading
-
Read the Laravel docs on Authentication on
- Password confirmation
- Automatic password rehashing
- Customizing guards and providers
- Social authentication with Laravel Socialite
08.2
Completing the authentication logic
Completing the authentication logic ("Step 3")
- Most often, you will need more functionality than just logging in and out, such as rate limiting, registration, password reset, email verification, …
-
Two possible scenario's:
-
Keep on programming your routes, controllers and templates manually.
- Best option for learning/understanding
-
Use Fortify (+ starter kit if applicable).
- Best option for a production-ready application: handles edge cases and benefits from ongoing security fixes through updates
-
Keep on programming your routes, controllers and templates manually.
Scenario 1: manual implementation
-
Get inspired by the code of the discontinued Breeze package ⟶ let's have a look
- 15 routes bundled into
routes/auth.phpincluded fromroutes/web.php - 9 controllers for any of the HTML Forms e.g.
AuthenticatedSessionControllerfor login - 1 example controller: ProfileController
- 1 form request
- 2 trivial Blade component classes
- a large set of Blade templates
- 15 routes bundled into
Scenario 2: Fortify
-
Install Fortify by
composer require laravel/fortify php artisan fortify:install php artisan migrate - Config the Fortify Features and views
- Get started with authentication …
- You see? The building blocks (routes and controllers) are inside the library, but are nevertheless easily configurable
08.3
Authorization
= verifying what a user has access to
Authorization Introduction
-
Laravel's Authorization
- Principle: once a user is authenticated, allow or prevent user actions against a given resource
-
Most commonly, it is about Creating, Reading, Updating or Deleting a specific Eloquent model
- a user might (not) be entitled to do so because
- (s)he has a certain role (e.g. admin, customer)
- (s)he is (not) the owner of the resource
- a user might (not) be entitled to do so because
- With Laravel's Authorization, you can check this in a structured way
-
2 mechanisms
- Gates: simple mechanism where you express an authorization feature as a function
- Policies: group all authorization logic by resource
- Robust Laravel applications are using policies
Gates: Definition
-
To be defined in
boot()ofApp\Providers\AppServiceProvider -
First parameter must be of type
User(will be bound to the Eloquent model of the authenticated user)use App\Models\Post; use App\Models\User; use Illuminate\Support\Facades\Gate; /** * Bootstrap any application services. */ public function boot(): void { Gate::define('update-post', function (User $user, Post $post) { return $user->id === $post->user_id; }); }
Authorizing with Gates
-
At the start of your controller method:
if (! Gate::allows('update-post', $post)) { abort(403); } // Update the post... -
Same, shorter version:
Gate::authorize('update-post', $post); // Update the post... - Alternately, if you are in a form request,
authorize()will automatically generate403when it failspublic function authorize(): bool { return Gate::allows('update-post', $post); } - Check single permissions with
Gate::allows()andGate::denies() - Check combinations of permissions with
Gate::check(),Gate::any()andGate::none() - Check for other users with
Gate::forUser($user) - Customize gate responses
Creating a Policy
- Example: you want to write the authorization logic for your
App\Models\Productmodel -
First step: create an empty policy class
The optionphp artisan make:policy ProductPolicy --model=Product--modeladds example methods related to viewing, creating, updating, and deleting aProduct -
⟶ the class is created in
app/Policies -
Registering the policy?
- Not needed, as the policy class name =
model class name+Policy(auto-discovery) - If you have another naming convention, you can register the policy in
App\Providers\AppServiceProvider
or, alternatively, place thepublic function boot(): void { Gate::policy(Product::class, ProductPolicy::class); }UsePolicyattribute on a model class#[UsePolicy(ProductPolicy::class)] class Product extends Model
- Not needed, as the policy class name =
Writing a Policy
<?php
namespace App\Policies;

use App\Models\Product;
use App\Models\User;

class ProductPolicy
{
    /**
     * Determine if the given product can be updated by the user.
     */
    public function update(User $user, Product $product): bool
    {
        return $user->id === $product->user_id;
    }

    /**
     * Determine if the given user can create products.
     */
    public function create(User $user): bool
    {
        return $user->role == 'admin';
    }
}
Authorizing with Policies (1)
-
You will use
can()andcannot()
Important: if no policy method found, they look for a gate -
At the start of your controller method:
if ($request->user()->cannot('update', $product)) { // Auth::user() is fine too ;-) abort(403); } // Update the product... -
Same, shorter version:
Gate::authorize('update', $product); // confusing though // Update the product... - Alternately, if you are in a form request,
authorize()will automatically generate403when it failspublic function authorize(): bool { $product = Product::find($this->product_id); // given product_id is an input value of the Request return $this->user()->can('update', $product); } -
For actions that don't require model instances, you specify the class:
if ($request->user()->cannot('create', Product::class))
Authorizing with Policies (2)
-
Better: authorize via the
canmiddleware 😀use App\Models\Product; Route::put('/product/{product}', function (Product $product) { // The current user may update the product... })->middleware('can:update,product'); Route::post('/product', function () { // The current user may create products... })->middleware('can:create,App\Models\Product'); -
Some syntactic sugar:
use App\Models\Product;

Route::put('/product/{product}', function (Product $product) {
    // The current user may update the product...
})->can('update', 'product');

Route::post('/product', function () {
    // The current user may create products...
})->can('create', Product::class);
Blade's @can and @cannot
-
Work for both gates and policies:
@can('update', $post)
    <!-- The current user can update the post... -->
@elsecan('create', App\Models\Post::class)
    <!-- The current user can create new posts... -->
@else
    <!-- ... -->
@endcan

@cannot('update', $post)
    <!-- The current user cannot update the post... -->
@elsecannot('create', App\Models\Post::class)
    <!-- The current user can now create new posts... -->
@endcannot
08.4
Demo
Demo outline
- Remember the webshop demo pages
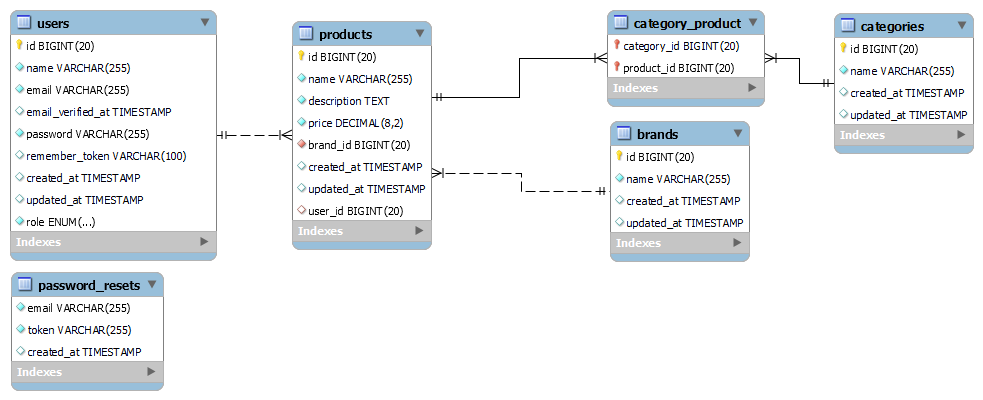
/products,/products/{id}and/products/create? - ⟶ Let's integrate the users table into the model and extend the users with roles (customer or admin)
- ⟶ Let's protect
/products/createfrom unauthenticated & unauthorized (= customer) users - ⟶ Let's have a look at the code …
08.5
Web API Authentication
Laravel Passport and Laravel Sanctum
- Laravel Passport the official library implementing pseudo-authentication with OAuth 2.0, the industry-standard protocol
- Laravel Sanctum: the official lightweight Web API Authentication library
-
Sanctum supports 2 types of authentication
-
API Token Authentication: your application can issue API tokens, having a very long expiration time, to end users (typically developers). When a 3rd party application makes a request to your Web API, the token should be included in the
Authorizationheader -
SPA Authentication: your SPA is in the same top-level domain and can send requests in order to authenticate individual users. Actually, Sanctum ± falls back to the stateful authentication (with session cookies) you already know.
⟶ we'll only talk about this type
-
API Token Authentication: your application can issue API tokens, having a very long expiration time, to end users (typically developers). When a 3rd party application makes a request to your Web API, the token should be included in the
What Sanctum SPA authentication actually does
-
Adds middleware
EnsureFrontendRequestsAreStatefultoapigroup-
detects if the request comes from your frontend (
OriginorRefererheader from stateful domain) - if so, re-enables sessions and session-based authentication
-
checks CSRF token in HTTP header
X-XSRF-TOKEN
-
detects if the request comes from your frontend (
-
Adds route
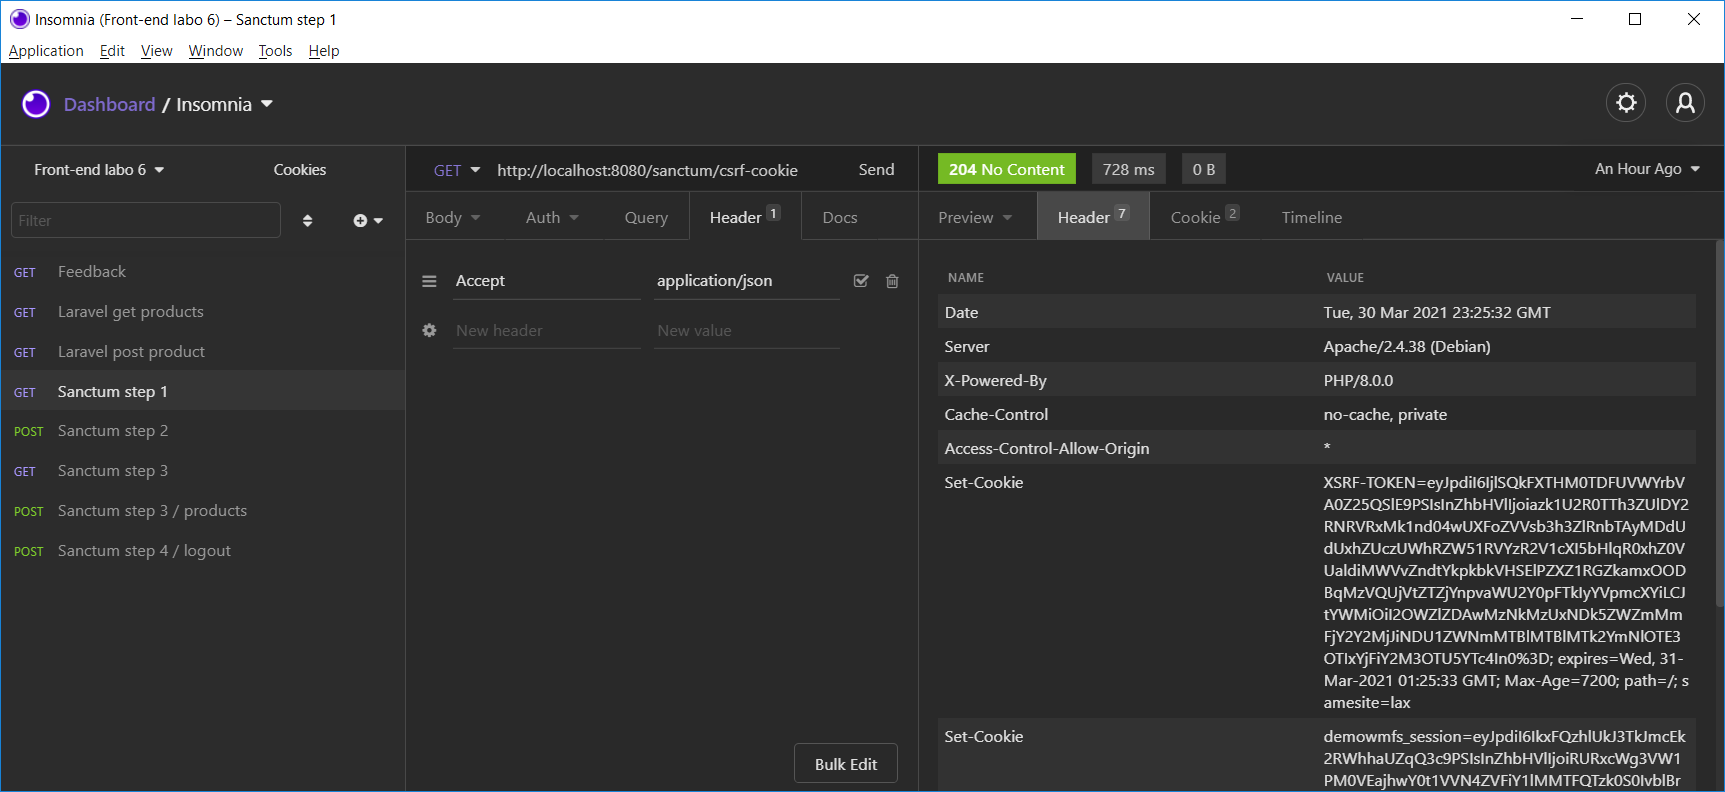
GET /sanctum/csrf-cookiehanding out aXSRF-TOKENcookie -
Offers middleware
auth:sanctumto protect your Web API routes
Installation Recipe
-
As described in the Sanctum docs:
php artisan install:api(we already did so)- (migration is only required for API Token Authentication)
- Add Sanctum's middleware in
bootstrap/app.php->withMiddleware(function (Middleware $middleware) { $middleware->statefulApi(); }) - Open
config/sanctum.phpand make sure that your front enddomain:portcombination is inSANCTUM_STATEFUL_DOMAINS. This setting determines for which domains authentication cookies are set.
Attention:localhost:5173is not the same as127.0.0.1:5173 -
Is your front end on a separate subdomain?
-
Publish
config/cors.phpbyphp artisan config:publish cors.
Set'supports_credentials' => true.
This will enable HTTP responses withAccess-Control-Allow-Credentials: true -
Still in trouble? Set
SESSION_DOMAIN=.my-domain.comin.env. The leading.will ensure session cookies are set for any subdomain of the root domain.
-
Publish
Routes Recipe (1)
-
The route
GET /sanctum/csrf-cookiehands out CSRF tokens as it sets anXSRF-TOKENcookie- The value of this cookie must be sent in the
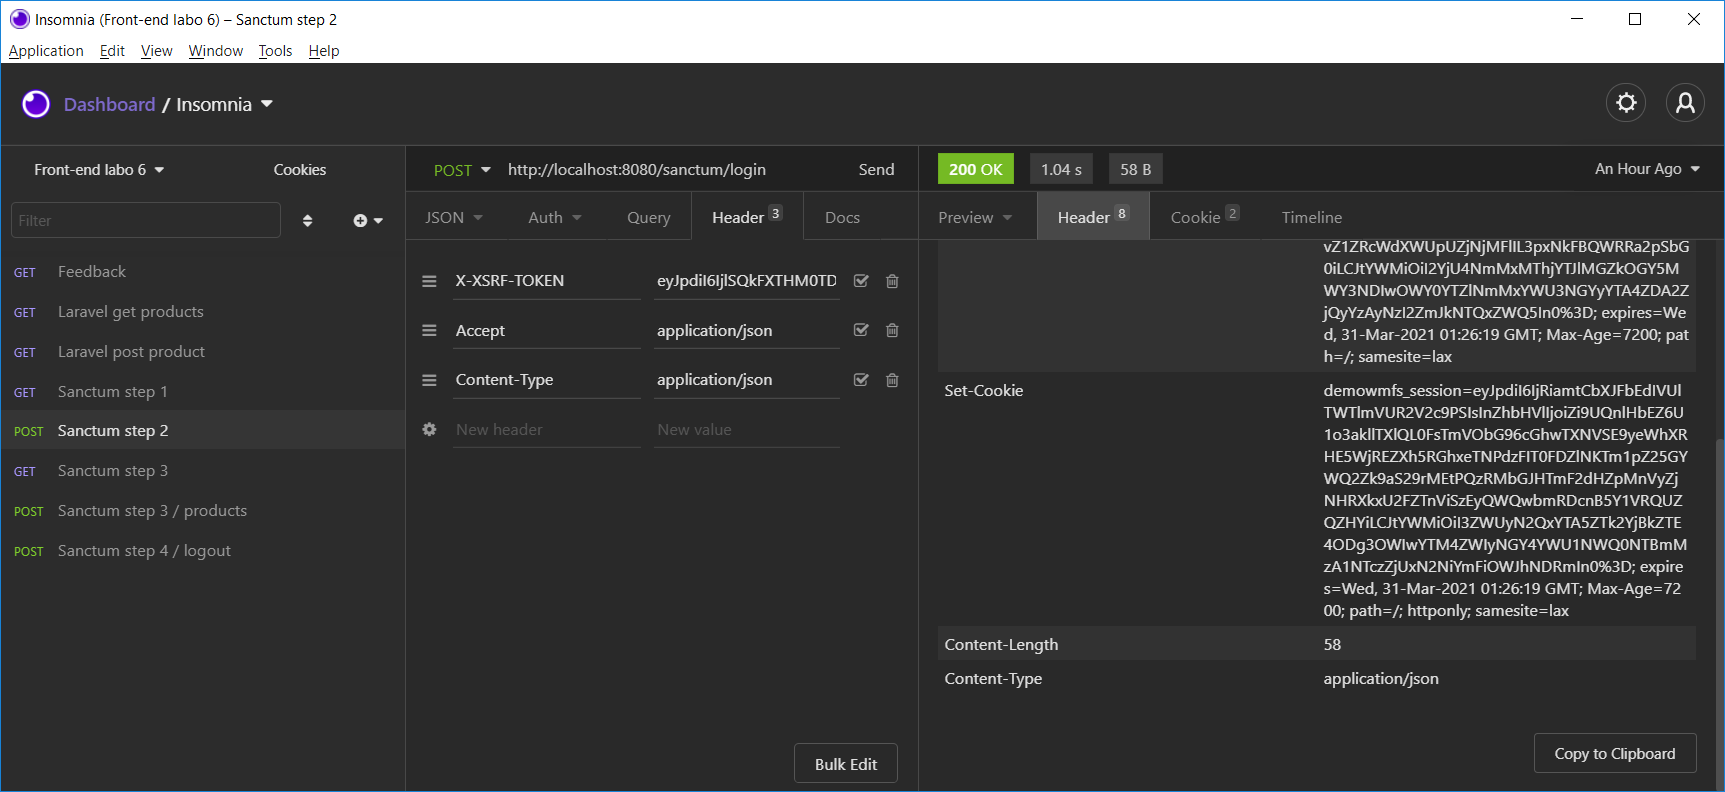
X-XSRF-TOKENheader(!) of subsequent requests - Some JavaScript libraries do this automatically for you
- The value of this cookie must be sent in the
-
You can implement your login route yourself in
routes/web.php(!!!) or use Fortify-
For example,
POST /api/loginRoute::post('/api/login', function (Request $request): Response { $credentials = $request->only('email', 'password'); if (Auth::attempt($credentials)) { $request->session()->regenerate(); // do your tests first without this line return response(['message' => 'The user has been authenticated successfully'], 200); } return response(['message' => 'The provided credentials do not match our records.'], 401); }); - As the normal
webmechanisms apply here, after successful login Laravel sets a session cookie (e.g.laravel_session), of which the server remembers there is successful authentication and by whom
-
For example,
Routes Recipe (2)
-
Protect the Web API routes in
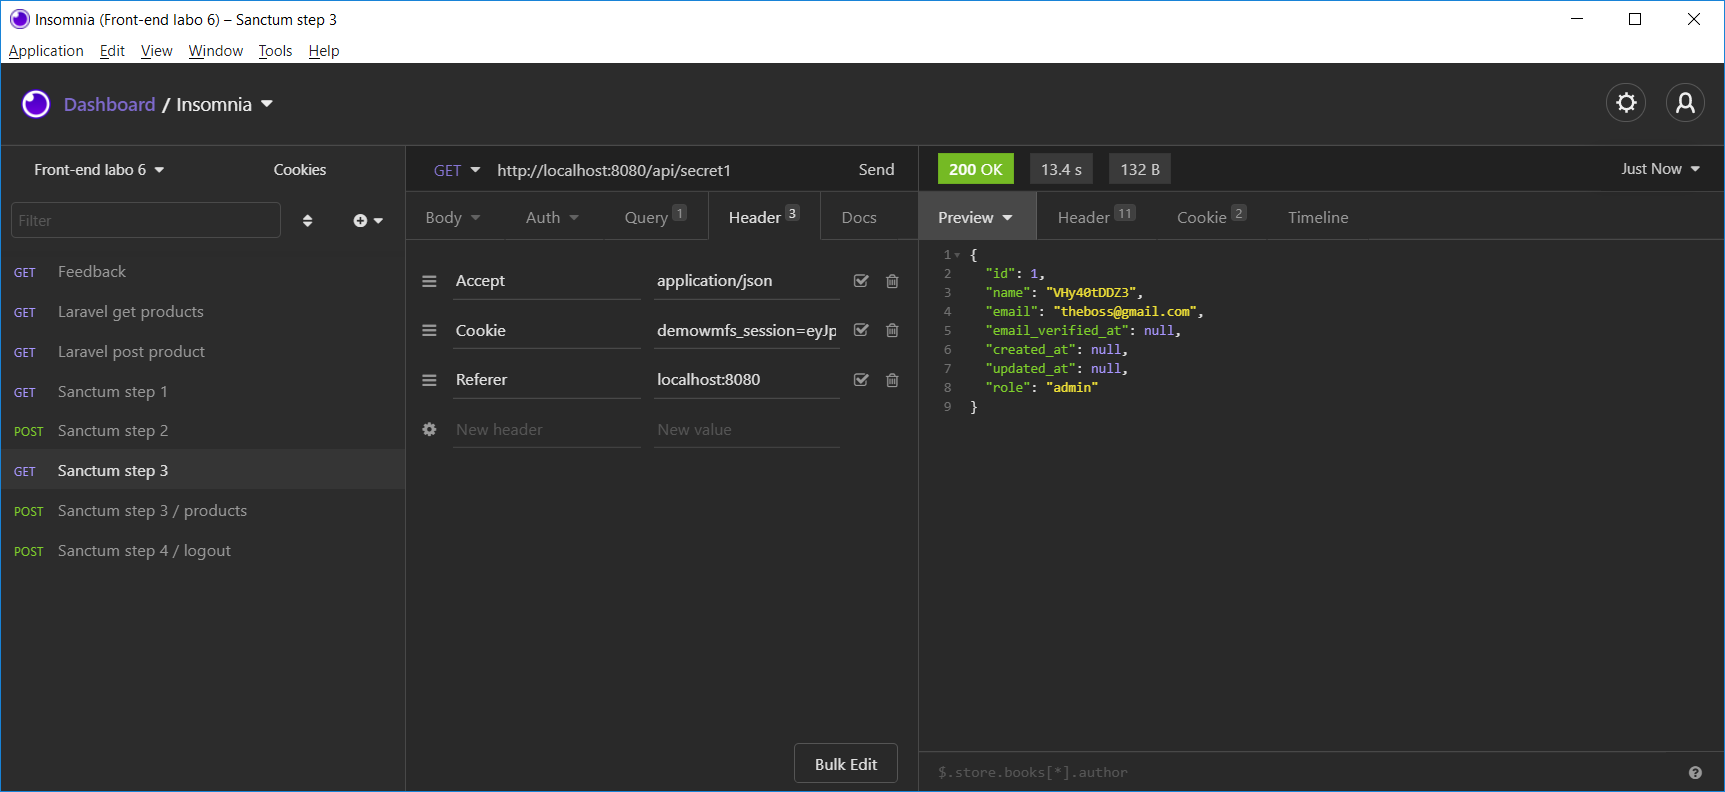
routes/api.phpby plugging theauth:sanctummiddleware:Route::get('/user', function (Request $request): User { return $request->user(); })->middleware('auth:sanctum');- Actually, Sanctum enables session-based authentication on API routes for frontend requests here
- So, if the user includes the right session cookie
laravel_session, the user is authenticated in the route - Some JavaScript libraries do this automatically for you
- Requests should include an
OriginorRefererheader so Sanctum can recognize them as frontend requests
-
You could implement your logout route yourself in
routes/web.php(!!!)-
For example,
POST /api/logoutRoute::post('/api/logout', function (Request $request): Response { Auth::logout(); $request->session()->invalidate(); return response(['message' => 'The user has been logged out successfully'], 200); });
-
For example,
Demo with Insomnia or Postman
Example
-
Use authentication and authorization as you were used to:
Route::post('/v4/products', function (Request $request): array {

    Gate::authorize('add-product');

    $request->validate([
        'name' => 'required|unique:products|max:125',
        'price' => 'required|numeric|min:0.10',
        'description' => 'required',
        'brand_id' => 'required|exists:brands,id'
    ]);

    $product = new Product($request->all());
    $product->user()->associate(Auth::user());
    $product->save();

    return ['message' => 'The product has been created'];

})->middleware('auth:sanctum');