Web Frameworks [OGI06i]
04. Forms
04.1
Named routes
Named routes
-
Specify a route name using the chained method
nameRoute::get('user/profile', function () { // })->name('profile'); -
The same with controller actions
Route::get('user/profile', [UserProfileController::class, 'show'])->name('profile');
Generating URLs To Named Routes
// Generating URLs…
$url = route('profile');

// … for routes with parameters
$url = route('profile', ['id' => 1]);

// Generating Redirects…
return redirect()->route('profile');
04.2
Blade Components
Blade Components
-
System similar to Blade sections, layouts and includes …
but better: components provide data and attribute binding - 2 types of components: class based and anonymous
- A component is like a Blade subtemplate, and a class based component is also backed by a class
Anonymous Components
- An anonymous component is a Blade template without a corresponding PHP class, perfect for simple, reusable UI elements that don't need complex logic
-
How to create?
Simply create a Blade template (directly) inresources/views/componentsresources/views/components/alert.blade.php resources/views/components/forms/input.blade.php -
or, using artisan:
php artisan make:component forms.input --view -
Example:
resources/views/components/alert.blade.php<div class="alert alert-{{ $type }}"> <strong>{{ $title }}</strong> {{ $slot }} </div> -
Usage in a Blade template:
<x-alert type="danger" title="Error">
    Something went wrong!
</x-alert>
Attributes
- All component attributes are automatically available as variables in the template
-
Data binding: use
:prefix to bind PHP expressions<x-alert :type="$severity" :message="$errorMsg" /> -
$attributes variable contains all remaining HTML attributes
<div class="alert" {{ $attributes }}>
    {{ $slot }}
</div>

<!-- Usage -->
<x-alert id="main-alert" data-toggle="alert">Alert content</x-alert>
(Named) Slots
- Slots are the sections of a component
-
File:
resources/views/components/card.blade.php<div class="card"> <div class="card-header"> {{ $header }} </div> <div class="card-body"> {{ $slot }} </div> <div class="card-footer"> {{ $footer }} </div> </div> -
Usage with named slots:
<x-card>
    <x-slot:header>Card Title</x-slot>
    Main card content here
    <x-slot:footer>Card Footer</x-slot>
</x-card>
Class Based Components (1)
-
How to create a class based component?
⟶ creates a view template inphp artisan make:component Alertresources/views/components
⟶ creates a component class inapp/View/Componentsclass Alert extends Component { public function __construct() { // } public function render() { return view('components.alert'); } } -
Example with subdirectories:
php artisan make:component Forms/Input
Class Based Components (2)
-
Example
<x-alert/> <x-forms.input/> -
Passing data by HTML attributes (variable attributes start with
:) …<x-alert type="error" :message="$message"/> -
… to be passed to the component's constructor:
class Alert extends Component { public $type; public $message; public function __construct($type, $message) { $this->type = $type; $this->message = $message; } - Public fields (/methods) are available in the component's view:
<div class="alert alert-{{ $type }}">
    {{ $message }}
</div>
Class Based Components (3)
- Slots are the sections of a component
-
Let's say we have in
/resources/views/components/alert.blade.php<span class="alert-title">{{ $title }}</span> <div class="alert alert-danger"> {{ $slot }} </div> -
Injecting content into the component:
<x-alert>
    <x-slot:title>
        Server Error
    </x-slot>

    <strong>Whoops!</strong> Something went wrong!
</x-alert>
Real-World Example: Form Input (1)
-
File:
resources/views/components/forms/text-input.blade.php<div class="form-group"> <label for="{{ $name }}" class="form-label"> {{ $label }} </label> <input type="text" id="{{ $name }}" name="{{ $name }}" value="{{ old($name, $value ?? '') }}" class="form-control @error($name) is-invalid @enderror" {{ $attributes }}> @error($name) <div class="invalid-feedback">{{ $message }}</div> @enderror </div>
Real-World Example: Form Input (2)
-
Using the form input component:
<form action="{{ route('products.store') }}" method="POST">
    @csrf

    <x-forms.text-input
        name="product_name"
        label="Product Name"
        required>
    </x-forms.text-input>

    <x-forms.text-input
        name="email"
        label="Email Address"
        type="email"
        placeholder="user@example.com">
    </x-forms.text-input>

    <button type="submit">Create</button>
</form>
Blade Components: Interested?
- Anonymous components are great for rapid development and simple reusable UI
- Class-based components for more complex logic
- Read more in the Laravel docs on Blade Components
04.3
Sessions
Sessions
-
By default the middleware
\Illuminate\Session\Middleware\StartSessionbacks a permanent Session, only for the routes inroutes/web.php - Principle: set a cookie (
appname_session) with a unique ID on the client and store data on the server across multiple requests for the user -
Where/how is the session data stored on the server?
- depends on the
driverconfiguration inconfig/session.php - by default it is set to
databasewhich requires asessionstable installable through0001_01_01_000000_create_users_table.php - easy setting:
filewhich means session data is stored as JSON instorage/framework/sessions
- depends on the
-
Store and retrieve session variables with
put, get, has, exists, increment, push, pull, forget, flush… (docs)$value = $request->session()->get('key'); $value = $request->session()->get('key', 'default'); $allData = $request->session()->all(); $request->session()->put('key', 'value');
Flash data in the session & more
- Flash a variable = store variable in the session only for the next HTTP request
$request->session()->flash('status', 'Task was successful!');

$request->session()->reflash(); // flash all data once again!

$request->session()->keep(['username', 'email']); // the same for a selection of vars

$request->session()->now('status', 'Task was successful!'); // store as flashed data but only for the current request
-
Regenerate the session ID by
$request->session()->regenerate();(often done after successful authentication in order to prevent session fixation) regenerate()+flush()by$request->session()->invalidate();
04.4
Handling forms
General approach
-
Blog post routes example
// Display a form to create a blog post... Route::get('blogposts/create', 'PostController@create'); // Store a new blog post... Route::post('blogposts/create', 'PostController@store'); - The first route shows a Blade template containing a form
-
The second route
- validates the HTTP request
- stores the blog post
- always redirects the user
About the other HTTP Verbs
-
Blog post routes example
// Display a form to create a blog post... Route::get('blogposts/create', 'PostController@create'); // Store a new blog post... Route::post('blogposts/create', 'PostController@store'); -
Don't use the other HTTP verbs (delete, put, patch)
- only the verbs GET and POST are allowed (see HTML standard)
- … unless you're faking the verbs with form method spoofing
- … unless you're building a RESTful web API
Cross-Site Request Forgery (CSRF)
- CSRF = A serious type of attack
A CSRF attack forces a logged-on victim’s browser to send a forged HTTP request, including the victim’s session cookie and any other automatically included authentication information, to a vulnerable web application. This allows the attacker to force the victim’s browser to generate requests the vulnerable application thinks are legitimate requests from the victim.
- Example
<form action="https://your-application.com/user/email" method="POST">
    <input type="email" value="malicious-email@example.com">
</form>

<script>
    document.forms[0].submit();
</script>- SOLUTION: Generate a unique CSRF token on each form load (and link that token to the user's session) and validate it upon form submission.
CSRF Protection
-
Include the automatically generated CSRF field/token in your (POST) form
// Vanilla PHP <?php echo csrf_field(); ?> // Blade Template Syntax … @csrf // … is the equivalent of: <input type="hidden" name="_token" value="{{ csrf_token() }}"> -
The
VerifyCsrfTokenmiddleware (part of thewebgroup) is already activated and does the checking - Read the Laravel docs on CSRF Protection on excluding CSRF protection and CSRF support for JS frameworks
A simple form v1 (1)
-
The Blade template
@include('common.errors') {{-- visualizes the $errors array --}} <form method="POST" action="{{ url('blogposts/create') }}" accept-charset="UTF-8"> @csrf <div class="form-group"> <label for="title">Title:</label> <input class="form-control" name="title" type="text" value="{{ old('title', '') }}" id="title"> </div> <div class="form-group"> <label for="content">Content:</label> <textarea class="form-control" rows="10" name="content" cols="50" id="content"> {{ old('content', '') }} </textarea> </div> <input class="btn btn-primary pull-right" type="submit" value="submit"> </form> - The helper method old retrieves an old input value flashed into the session
A simple form v1 (2)
-
The controller
public function create(): View
{
    return view('blogpost.add');
}

public function store(Request $request): RedirectResponse
{
    // building oldskool form errors …
    $errors = array();

    if (!(($request->has('title')) && (strlen($request->title) > 0))) {
        $errors[] = 'The title field is required.';
    } else if (strlen($request->title) > 125) {
        $errors[] = 'The title may not be greater than 125 characters.';
    } else if (Blogpost::where('title', $request->title)->exists()) {
        $errors[] = 'The title has already been taken.';
    }

    if (!(($request->has('content')) && (strlen($request->content) > 0))) {
        $errors[] = 'The content field is required.';
    }

    …
A simple form v1 (3)
-
The controller
public function store(Request $request): RedirectResponse
{
    // building oldskool form errors …
    …

    if (count($errors) > 0) {
        // flash the form errors in the session
        $request->session()->flash('errors', $errors);

        // flash the request inputs in the session and take previous route
        $request->flash();
        return back();
        // NOTE: flashing the request inputs was necessary since the user is REDIRECTED

        // also possible: return back()->withInput();

    } else {
        Blogpost::create($request->all()); // mass assignment
        return redirect('blogposts/success');
    }
}
Validation (1)
-
In our controller, the
validatemethod- takes the HTTP request and desired validation rules
- redirects the user back to his previous location upon failure (+ auto-flash of errors and input values)
public function store(Request $request): RedirectResponse
{
    $request->validate([
        'title' => 'required|unique:blogposts|max:125',
        'content' => 'required',
    ]);

    // The blog post is valid, store in database...
}
Validation (2)
-
Anticipating validation in your Blade templates
-
The
ShareErrorsFromSessionmiddleware (part of thewebgroup) assures an$errorsvariable is available in your views - Enjoy the richness of the rules available
'start_date' => 'required|date|after:tomorrow', 'finish_date' => 'required|date|after:start_date', 'finish_date' => ['required', 'date', 'after:start_date'], // same, alternative notation 'photo' => 'image|mimes:jpeg,png', // is an image of any type and its content is jpeg or png 'avatar' => 'dimensions:min_width=100,min_height=200', // image with specified dimensions 'state' => 'exists:states,abbreviation', // exists in column abbreviation of table states 'email' => 'email:rfc,dns', // has email format and valid domain (requires intl package) 'password' => ['required', 'confirmed', Password::min(8)->letters()->mixedCase()->uncompromised()], // for optional fields !!!!!! // since we have TrimStrings and ConvertEmptyStringsToNull middleware running 'publish_at' => 'nullable|date' -
The
Validation (3)
-
Read the Laravel docs on Validation on
- Stopping On First Validation Failure (bail)
- Validating arrays
- Form Request = classes encapsulating the validation and authorization logic
- Working With (field related) Error Messages
- Customizing Error Messages (in your app's language)
- Available Validation Rules
A simple form v2 (1)
-
The new version of the controller
public function create(): View { return view('blogpost.add'); } public function store(Request $request): RedirectResponse { $request->validate([ 'title' => 'required|unique:blogposts|max:125', 'content' => 'required' ]); Blogpost::create($request->all()); return redirect('blogposts/success'); } -
Remark:
validate()returns an associative array of the validated data. It does not contain non-validated fields and is considered an extra barrier against mass assignment vulnerabilities.$validatedData = $request->validate([ 'title' => 'required|unique:blogposts|max:125', 'content' => 'required' ]); // in stead of $request->title we can now use $validatedData['title'] Blogpost::create($validatedData);
A simple form v2 (2)
-
Change
common/errors.blade.phpsuch that it visualizes an $errors MessageBag@if ($errors->any()) <!-- Form Error List --> <div class="alert alert-danger"> <strong>Whoops! Something went wrong!</strong> <ul> @foreach ($errors->all() as $error) <li>{{ $error }}</li> @endforeach </ul> </div> @endif - This instance of
Illuminate\Support\MessageBagalso supports field-based retrieval, and has a specific Blade directive:<input id="title" type="text" class="@error('title') is-invalid @enderror"> @error('title') <div class="alert alert-danger">{{ $message }}</div> @enderror
04.5
File( upload)s
File Storage ≠ public folder
-
The public folder contains the assets (img, css, js, …)
- Assets directly accessible from the web server (link it with
asset()) - By default, you cannot handle (= store, edit, list, …) files there
- Assets directly accessible from the web server (link it with
-
File Storage is an abstraction layer which allows you to handle files on local and remote (cloud) systems in a uniform way
-
To be configured in
config/filesystems.php -
Organized as disks = configuration combination of a driver and a location.
For example, the
localdriver interacts with the local file system. -
Any of the disks can be used from your code, but you need to specify a default disk.
For example
Storage::get('file.jpg');operates on the default disk, whileStorage::disk('public')->get('file.jpg');operates on thepublicdisk.
-
To be configured in
The disks
-
The
localdisk- Uses the
localdriver and its root isstorage/app/private - Is the default disk in a fresh Laravel project
- Files saved on this disk, cannot be served from the web server later on
- Uses the
-
The
publicdisk- Uses the
localdriver and its root isstorage/app/public storage/app/publicis neither located inside the web server's document root but …-
Luckily, you can create* a symbolic link
public/storagetostorage/app/public☺$ php artisan storage:link The [public/storage] directory has been linked. -
Keep on using the
asset()helper:{{ asset('storage/file.txt') }}
- Uses the
File uploads
-
Checklist
- Set the
publicdisk as the default filesystem disk in.env(and/orconfig/filesystems.php) - Create a symbolic link to
storage/app/public - In your
<form>element (Views): check yourenctypeattribute (see this course) - Validation: check on file (MIME) type and eventually file size, dimension, …
-
Use a
*with multiple file uploads e.g.documents.* -
Check the type. Don't let *.php (and many others) pass!
Hint:
imageis a rule too
-
Use a
- Of course you need to store the file upload
-
store()will assign a unique ID filename. Most of the time, it's a good practice. (think of duplicates) - If the path (relative to Filesystem root) does not exist, the folders are created (think of a clean directory structure)
-
- Set the
04.6
Server-side filtering & pagination
Filtering?
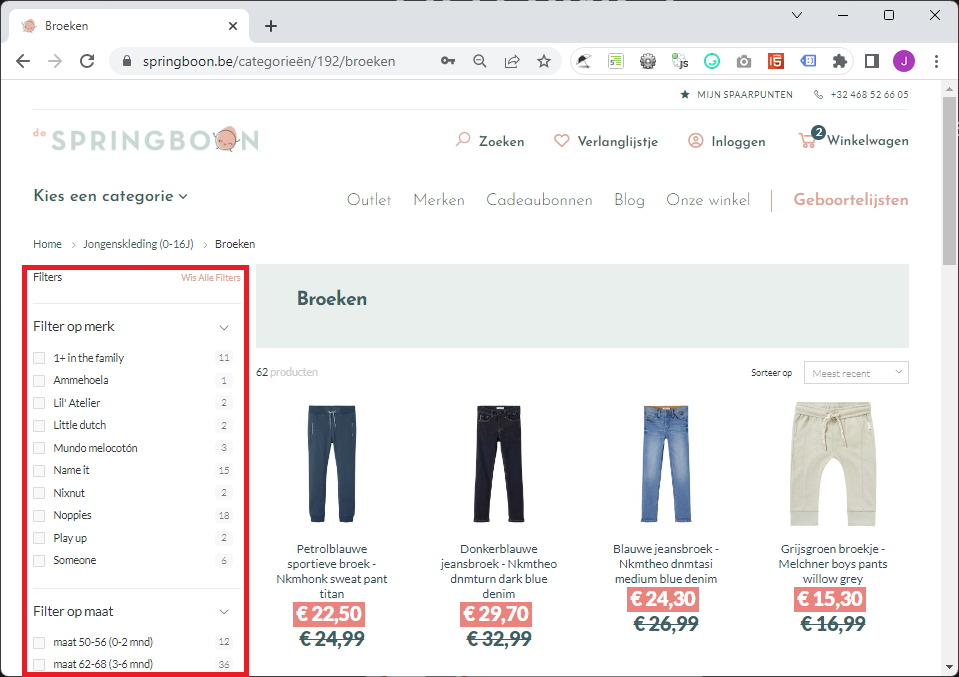
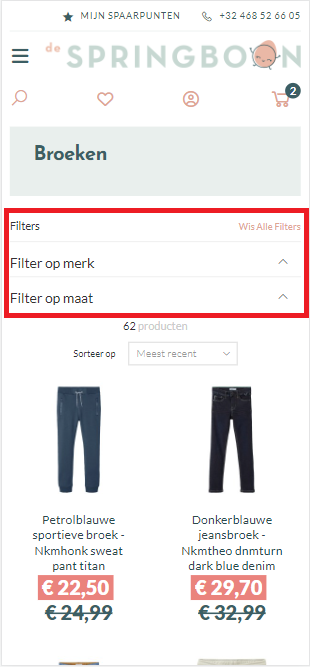
-
Allow a visitor to refine a set of results
- A form with checkboxes, dropdowns, etc. per defining property of the result set
- Typically placed
- on the left hand side, next to the results (desktop)
- above the results, collapsible or linking to menu (mobile)
- SQL example:
WHERE (brand_id = 5 OR brand_id = 6) AND (price BETWEEN 100 AND 200) AND … - It is necessary to persist the form values (!)
-
Typically in combination with
- Pagination
- Sorting on specific properties of the result set (asc/desc)
Filtering scenarios
-
Filter via
GETparams- Pro: links can be shared/bookmarked
- Con: links become cluttered
- Con: filter not preserved after having navigated away
-
Filter via
Sessionparams- Pro: links don't become cluttered
- Pro: filter preserved after having navigated away
- Con: links can't be shared/bookmarked
Filtering (GET) in Laravel (1)
-
Routing: just stick to 1 (GET) route
parameter example:Route::get('/products', [ProductController::class, 'filter']);products?brand_id=64&category_id=3&size=L,XL
⟶ no redirect on failing validation and no session flashing (and noold()) -
Blade persistence by
request()(orsession()->get())<select name="brand_id" id="brand_id" class="form-control"> @foreach ($brands as $brand) <option value="{{ $brand->id }}" @if (request('brand_id', '') == $brand->id) selected="selected" @endif>{{ $brand->name }}</option> @endforeach </select>
Filtering (GET) in Laravel (2)
-
Some example controller code
Never do$validator = Validator::make($request->all(), [ // Manually Creating Validators 'brand_id' => 'nullable|exists:brands,id', … ]); if ($validator->passes()) { $products = Product::query(); // returning a neutral Builder object if ($request->filled('brand_id')) { // might be some other condition e.g. has(), == 0 $products->where('brand_id', $request->brand_id); // chaining changes the state of the Builder object anyway ! } $products->when($request->filled('category_id'), function (Builder $query, string $categoryId) { // syntactic sugar using when() return $query->where('category_id', $categoryId); }); // Never do: $products->where('size', 'L')->orWhere('size', 'XL') // use logical grouping in stead $products->where(function (Builder $query) { $query->where('size', 'L') ->orWhere('size', 'XL') }); // or more simple: whereIn $products->whereIn('color', ['red', 'blue']); }$products->where('size', 'L')->orWhere('size', 'XL')
because in SQL AND has precedence over OR. So your SQL-query becomes:
... WHERE ((brand_id = 64) AND (category_id = 3) AND (size = 'L')) OR (size = 'XL')
Pagination?
-
When having too many items to show, split them into several pages
- e.g. search results, filter results
- Paginator typically placed beneath the results
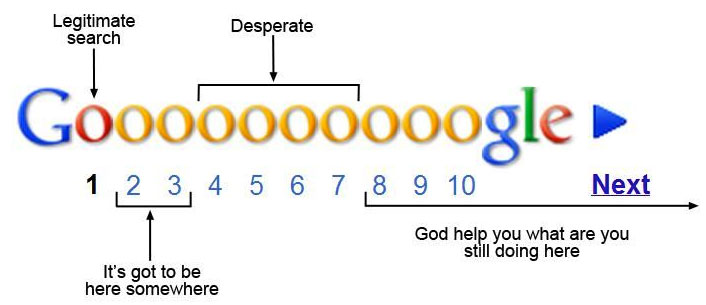
Examples
-
Bad examples:


-
Good example:
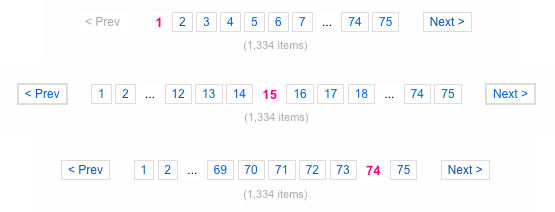
- Always indicate how many results there are
- Always indicate how many pages there are
-
Show a reasonable number of pages
- The number row automgically adjusts itself based on the current page
- First two and last two pages always shown
- All, except the current page, clickable
-
Always indicate current active page
- Don't link it though!
-
Always show next/previous buttons
- Only clickable when necessary
- Don't show First/Last links (no direct value)
Pagination internals
- From database: Total number of items
- Number of items to show per page
- Parameter in url: current page (default = 1)
-
To calculate: number of pages
$numPages = ceil($numItems / $numItemsPerPage); - From database: a subset of items (ORDER BY, LIMIT)
- A pagination rendering strategy
Pagination in Laravel (1)
-
Use the
paginatemethod with Query Builder or Eloquent-
detects
?pagequery string argument on the HTTP request - gets the items from the DB through proper limit and offset
- returns a paginator object which is loopable like a result set
public function index(): View // controller method { $users = User::where('votes', '>', 100)->paginate(15); // uncomment next line to change the paginator's target URL // $users->setPath('custom/url'); return view('user.index', ['users' => $users]); } -
detects
- Don't use
simplePaginate: it will only generate prev/next buttons
Pagination in Laravel (2)
-
Simple (Tailwind CSS or bootstrap compatible) display in Blade
<div class="container"> @foreach ($users as $user) {{ $user->name }} @endforeach </div> {{ $users->links() }} - It's up to you to find a better strategy than rendering all the page links
04.7
Concluding demo
Concluding demo
- Let's build an admin panel for last week's webshop
- Let's talk about URL design ⟶
- Let's use Eloquent in the ProductController ⟶
- Let's add the Blade templates ⟶
- Let's realize form validation and form persistence ⟶
04.8
Bonus: Form Requests
Form Request
- Definition: custom class encapsulating (complex) validation and authorization logic
- Typically for handling 1 request sent by a form
-
It's called a request because
FormRequest extends Request - Objective: don't clutter your controller code with long and complex validation (example: fold-out form)
Creating a Form Request
-
How to create a form request?
php artisan make:request StorePostRequest -
⟶ a form request class is created in
app/Http/Requestsclass StorePostRequest extends FormRequest { /** * Determine if the user is authorized to make this request. * */ public function authorize(): bool { return false; } /** * Get the validation rules that apply to the request. * * @return array<string, \Illuminate\Contracts\Validation\Rule|array|string> */ public function rules(): array { return [ // ]; } }
Specify rules()
-
Example
/**
 * Get the validation rules that apply to the request.
 *
 * @return array<string, \Illuminate\Contracts\Validation\Rule|array|string>
 */
public function rules(): array
{
    return [
        'title' => 'required|unique:posts|max:255',
        'body' => 'required',
    ];
}
Specify authorize()
-
Example
/** * Determine if the user is authorized to make this request. * */ public function authorize(): bool { // assuming my 'users' table has an enum column 'role' return $this->user()->role == 'blogger'; } - Most likely, you wil interact with your authorization gates and policies here ⟶ we'll see this later on in this workshop
- If you plan to put your authorization logic elsewhere, just write
return true;
Applying the Form Request
-
Just type-hint the form request on your controller. Yes, that's all.
/** * Store a new blog post. * */ public function store(StorePostRequest $request): RedirectResponse { // The incoming request is valid and authorized ... Blogpost::create($request->all()); // Extra FormRequest functionality: // $request->validated() // $request->safe()->only(['name', 'email']) return redirect('/posts'); } - You see?
FormRequest extends Request - When the
rules()fail, the errors and input values are flashed into the session and the user is redirected - When the
authorize()fails, a403page is shown
Further Customization
- Performing additional validation
- Customizing the error messages and attribute names (!)
- Preparing the input for validation